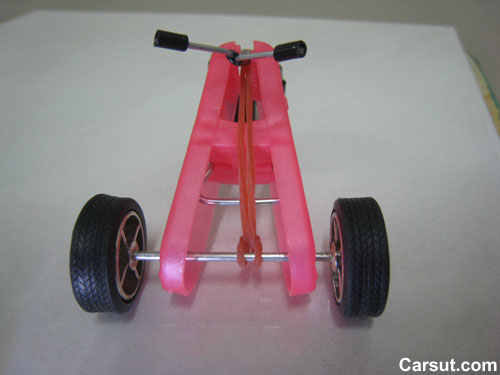
Build a rubber band powered car

There are many ways to build a rubber band powered car. But it requires some skills to build one that really goes very fast and very far. Here you can find the step by step on how to build a rubber band car that can go fast. It takes only a few minutes by using some recycle things in your home.
Step 1: Prepare the material

Wheels and Axle: Use the wheels of an unwanted toy car. The wheels come with an axle and a steering. You can choose to make your own wheels by using unwanted CD, DVD, or some round object that is able to function like a wheel. For the axle, you can either use pencil, chopstick, pen or the internal chamber of a ballpen. To make it more interesting, we only use three wheels to create a three-wheel car.
Car Body: For the car body, the lighter the better. It also depends on how you want to design the car. You can choose polyethylene foam or recycle items such as plastic bottles. You can also use marker pen or color pencil to draw some nice art on the foam to make it attractive. We picked a nice clothespin in this tutorial.
Engine: The engine is without doubt a powerful rubber band.
Tools: Prepare a pair of scissors, a pencil/marker, a ruler, a small knife, needle nose pliers, and masking tape.
Step 2: Attach the wheel
Attach the wheels to the body (clothespin) through the hole of the clothespin. You will see the car now is shaped like the alphabet “A”.

Step 3: Build the front wheel

Use needle nose pliers to create a cool front wheel as shown in the pictures here. Imagine that you are making a cool chopper. The material must be strong because it will work as the rubber band support.

Step 4: Clip the front wheel to the clothespin
Make sure you clip it tight otherwise the car will not move straight.
Step 5: Attach the rubber band
Attach the rubber band to the rear axle as shown in the picture below. Make sure the position is correct.
On your left is the correct way to attach the rubber band to the rear axle. The car will go forward. On your right is the incorrect way to attach the rubber band to the axle because the car will go the reverse way.

Step 6: Test Drive
Once you have attached the rubber band to the axle, attach the other end to the front axle (rubber band support) you build in Step 3. Turn the axle several times to store energy to run the car. The axle will spin when you release your hand and the energy will move the car forward. The more rounds you turn the axle, the faster and further the car will go. Now you have completed your own rubber band powered car and what you need to do is put it on the floor and go for a spin.
Tips to build a faster rubber band powered car
The example we share here is just a basic rubber band car. It is easy to build and fun to play. It looks cool too, right? If you want to build a faster rubber band car, you can follow the tips here:
Car Body: The logic is same like all kind of cars running on the road. Don’t choose materials that are heavy to build the car especially wood. Use cardboard, cork, PVC foam board, or polythene foam.
Wheels: When you build the wheels, choose materials that will give better traction such as rubber. This is the reason car tires are made of rubber. CD or DVD is good but the grip is bad on smooth surface.
Power: Attach the rubber band to the best position to generate the maximum power.
Axle: Choose light material for the axle but it must be strong enough to hold the rubber band. When you fix the wheels to the axle, make sure there is no leeway. You can use some glue to make sure the axle and wheels are stuck together.

